Entering Data
Entering Basic Data
Once your Schedule Structure is set up, you’re ready to enter the core information that defines your school’s schedule: Classes, Teachers, and Subjects.
For more detailed walkthroughs on each area, see:
Classes
A Class in ScheduLearn represents a group of students (e.g., 7A, Grade 5, Year 10). Most schools create one Class per homeroom or section. Smaller schools may have only a single Class for each grade.
Creating a Class does not prevent you from scheduling multiple lessons at the same time, nor does it restrict tracked or split subjects (these should be configured later when setting up Subjects and Divisions).
To create a Class:
- Navigate to the Classes Page
- Click Add Class on the toolbar
- Name the Class (e.g., 7A, Grade 9) and save
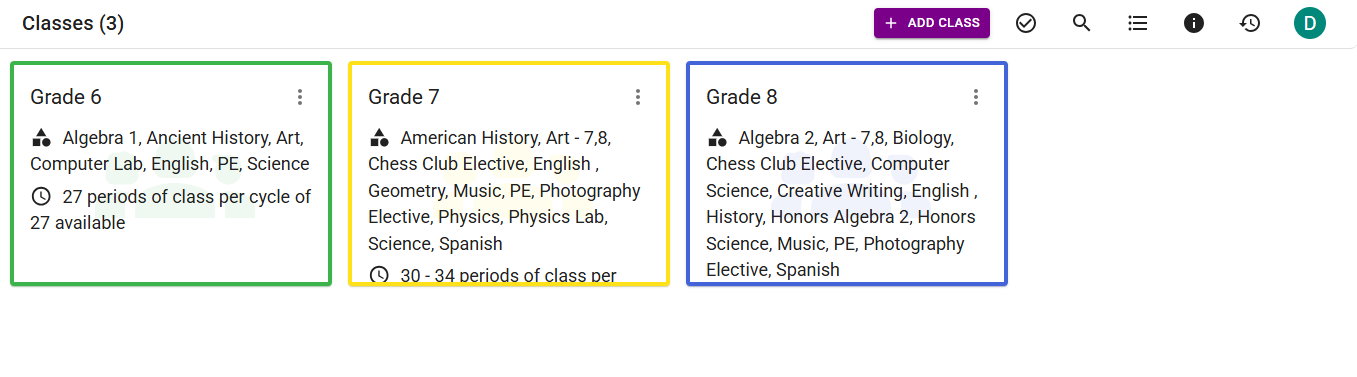 Figure 1 — The Classes Page
When first getting started, you will not have any Subjects yet. Once Subjects exist, they will appear automatically in the Subjects dropdown section on each Class card.
When getting started you can ignore:
- Class Divisions
- Edit Class Calendar
These features are explained in the Classes Tutorial when you are ready to use them.
Teachers
To add a teacher:
- Navigate to the Teachers Page
- Click Add Teacher
- Enter the teacher’s name and save
Tip
Teachers are sorted alphabetically. Many schools format names as Last, First so they are easier to locate.
We recommend waiting to add teacher availability constraints until after you have created some Subjects and generated your first schedule.
Subjects
A Subject is taught to one or more Classes and consists of one or more Lessons.
- If Math is taught separately to 7A and 7B → Create two Subjects (e.g., Math 7A, Math 7B).
- If the two classes take Math together with the same teacher(s) → Create one Subject and select both Classes.
To create a Subject:
- Navigate to the Subjects Page
- Click Add Subject
- Fill out the fields described below
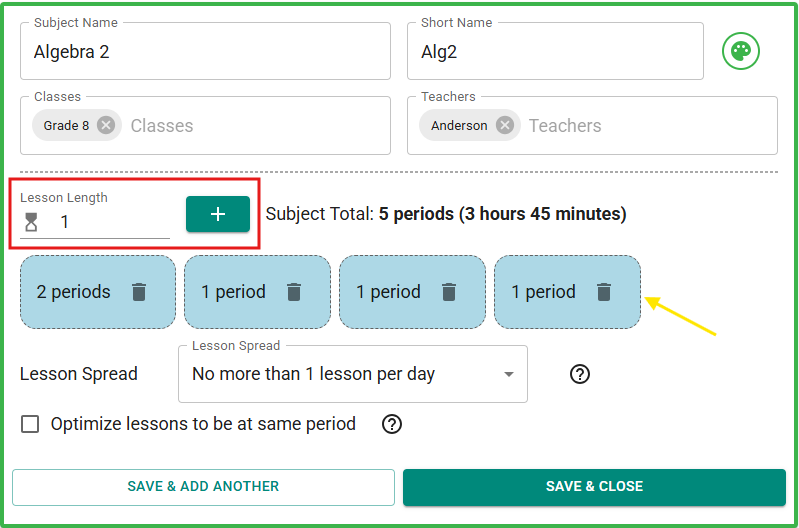 Figure 2 — Adding a Subject
Subject Fields
| Field | Description |
|---|---|
| Subject Name | The name of the subject (e.g., English, Math 9, Homeroom). |
| Short Name | A 4-character abbreviation used in compact schedule views. Automatically suggested. You can override it if desired. |
| Classes | Select all Classes that take this Subject. All selected Classes will have this subject scheduled at the same time. |
| Teachers | Choose the teacher(s) who teach this subject. Selecting more than one teacher is useful for co-teaching/teaching assistants. You may also leave this field blank and come back later. |
Shortcut
When selecting Classes or Teachers, typing a name that doesn't exist will give you the option to create it automatically, without leaving the page.
Adding Lessons
Each Lesson represents one scheduled meeting of the Subject (see yellow arrow).
- Set the Lesson Length (see the red rectangle in Figure 2)
- Click + to add the lesson
- Lessons will appear listed below
In Figure 2, the Subject contains:
- 4 lessons total
- 1 double-period lesson
- 3 single-period lessons
Lesson Spread
The Lesson Spread controls how lessons should be distributed across the cycle. Common options:
| Option | Meaning |
|---|---|
| No more than 1 lesson per day (default) | Each lesson must be on a different day. |
| 1 day can have 2 lessons | Allows one day to contain two lessons. |
| No more than 2 lessons per day | Every day may contain up to two lessons. |
| At least 1 lesson per day | Ensures the subject appears every day when there are more lessons than cycle days. |
| None | No distribution preference — the scheduler may place lessons anywhere. |
If the selected Lesson Spread is impossible to satisfy, the scheduler will notify you when generating the schedule.
Optimize lessons to be at the same period
This feature can be useful if you want your schedule to be largely consistent day to day. If you enable this for a subject, the scheduler will do its best to place each lesson at the same period every day.
See the detailed Subjects Tutorial for advanced features, such as modifying individual lessons and creating subjects with no assigned class (e.g., a teacher-only subject, which is useful for scheduling weekly teacher meetings).
Bulk Importing Data (The Import Wizard)
If you already have your school's data in a spreadsheet, you can save significant time by using the Import Wizard. This tool allows you to upload a file and automatically generate your Classes, Teachers, and Subjects all at once.
To access the Import Wizard, click your account icon on the top right of any page and select Import Wizard.
Preparing Your File
The wizard supports .xlsx, .xls, and .csv formats.
If you aren't sure how to format your data, you can click Download Template on the first step of the wizard to get a pre-formatted example.
- Multiple Items: If a subject has multiple teachers or is taught to multiple classes simultaneously, simply separate the names with commas in your spreadsheet (e.g., "Mr. Smith, Ms. Davis" or "Grade 9, Grade 10").
- Double Periods: You only need to define the total Number of Lessons in your file, that is, the number of times the subject should happen a week. You can easily adjust each lesson into double or triple periods later in the wizard.
Step-by-Step Import Guide
1. Upload & Structure Selection
-
Select Structure: If your school uses multiple Schedule Structures, you will first be prompted to select which structure you want to import this data into.
For schools that have multiple schedule structures: You can only import subjects into one schedule structure at a time. Repeat the import process for each structure
-
Upload: Drag and drop your spreadsheet into the upload area or click to browse your files.
2. Map Columns
ScheduLearn needs to know which columns in your spreadsheet match our system fields. Use the dropdown menus to match your file's headers to:
- Subject Name
- Teacher Name
- Class / Group
- Number of Lessons
3. Resolve & Clean Data
This step is where ScheduLearn helps you prevent typos and duplicate entries. The system scans your file and compares it to any Teachers or Classes already in your database.
For every Teacher and Class found in your file, you must choose an Action:
- Create New: Creates a brand-new entry in ScheduLearn.
- Link to Existing: If ScheduLearn finds an exact or close match in your existing data, it will suggest linking them to avoid creating duplicates.
- Combine with New: If your file contains typos (e.g., "Mr. Smith" and "Mr. Smtih"), the system will flag them as potential duplicates. You can merge them together here so they share the same correct name.
- Skip: Ignores the entry entirely so it is not imported.
Tip: Use the filter dropdown at the top right to quickly review "Merge Suggestions" or "Exact Matches."
4. Review Subjects
In the final step, you will see a list of all the Subjects ready to be created.
Here, you can review your data and make specific adjustments before finalizing:
- Edit Names & Links: Click into any text field to fix a subject name, or use the dropdowns to change the assigned teacher/class.
- Handle Duplicates: ScheduLearn will highlight rows in yellow if a similar subject already exists in your database or is duplicated earlier in your spreadsheet. You can hover over the warning icon to see why it was flagged, and toggle the switch to "Skip" the row if you don't want to import it.
- Adjust Lesson Lengths & Spread: Click the dropdown arrow on the far right of any row to open the advanced settings. Here, you can change the Lesson Spread Constraint (e.g., "No more than 1 lesson per day") and configure Lesson Lengths (e.g. making one lesson a double period).
5. Finish Import
Once you have resolved any missing information errors and skipped unwanted duplicates, click Finish Import.