Schedule Structure
📅 Creating your Schedule Structure
Tip
Your schedule structure is the foundation of everything else in ScheduLearn. Setting it up correctly from the start will save time and prevent issues later. Modifying the structure after building your schedule can be complex.
Planning Your School's Schedule Structure
ScheduLearn organizes the school day using blocks of time called periods. These periods are grouped into reusable day types, which are then assigned to specific days.
For many schools, creating the schedule structure is straightforward. However, schools with shortened Fridays, rotating schedules, or different divisions may require multiple day types or schedule structures.
You may need multiple schedule structures if different divisions operate on different bell schedules. For example, a Middle School and High School may share teachers and classrooms while using different period lengths.
If your schedule does not use fixed periods, ScheduLearn can still work effectively. One common approach is to create smaller “mini-periods” (such as 10 or 15 minute blocks) and schedule subjects using multiples of those periods.
For example:
- 3 × 15-minute periods = 45 minutes
- 4 × 15-minute periods = 1 hour
Keep in mind that using many small periods increases scheduling flexibility, but also increases solve times. We recommend keeping the number of periods as low as reasonably possible.
Setting Up Your First Day Type
When creating a schedule structure, you will first define the days in the cycle and then create your first day type.
Start by selecting the days your school has classes. You can choose:
- a standard weekly schedule,
- an A/B schedule,
- or a fully custom rotating schedule.
ScheduLearn treats these simply as named days. For example, an A/B schedule creates two days named “A” and “B”.
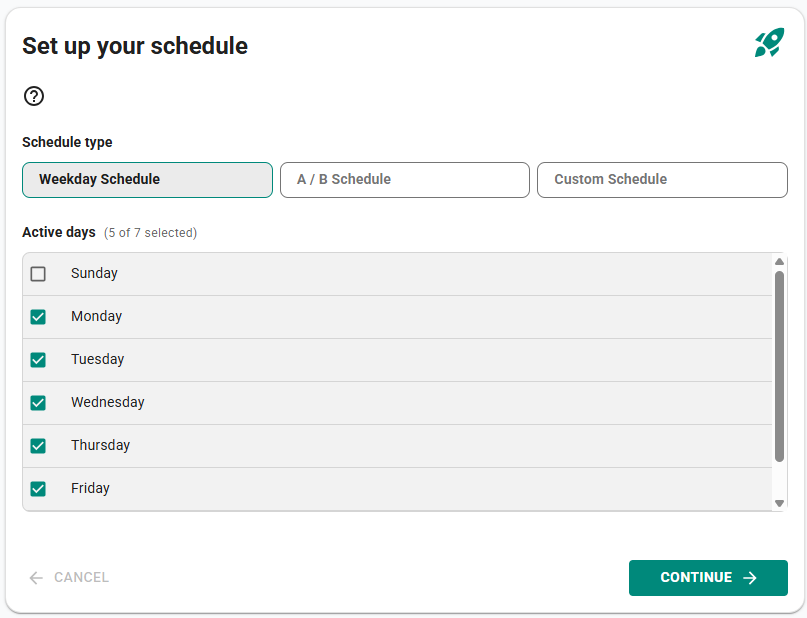
Figure 1: Selecting the days in your schedule cycle.
Next, create your first day type.
A day type defines the periods, times, and gaps for one or more days. If some days use different period times — such as a shortened Friday schedule — you can create additional layouts later.
When getting started, you will create just one layout first.
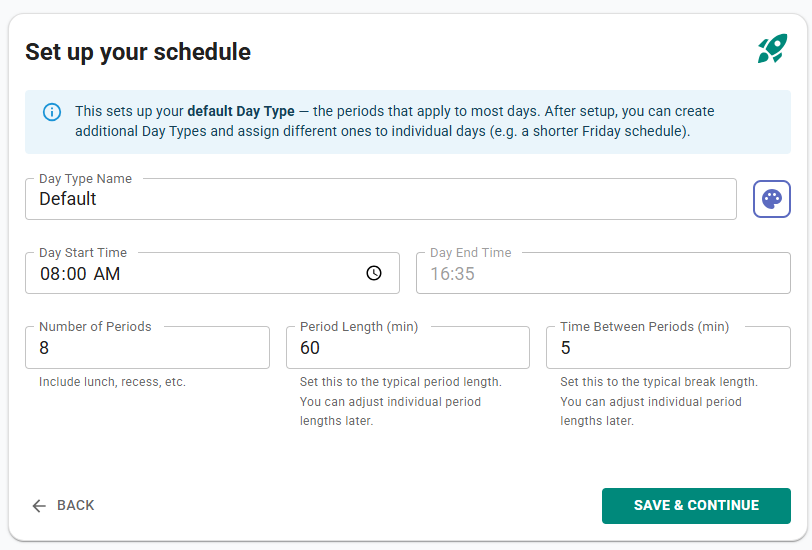
Figure 2: Creating your first day type.
You will be asked for the following information:
- Day Type Name — A descriptive name such as “Standard”, “M–Th”, or “Friday”.
- Day Start Time — The start time of the first period.
- Number of Periods — Total number of time blocks in the day, including lunch, breaks, recess, dismissal, etc.
- Period Length — Typical duration of each period. Non-standard periods can be adjusted later.
- Time Between Periods — The gap between periods. Set to 0 if periods should be continuous.
Modifying Your Schedule Structure
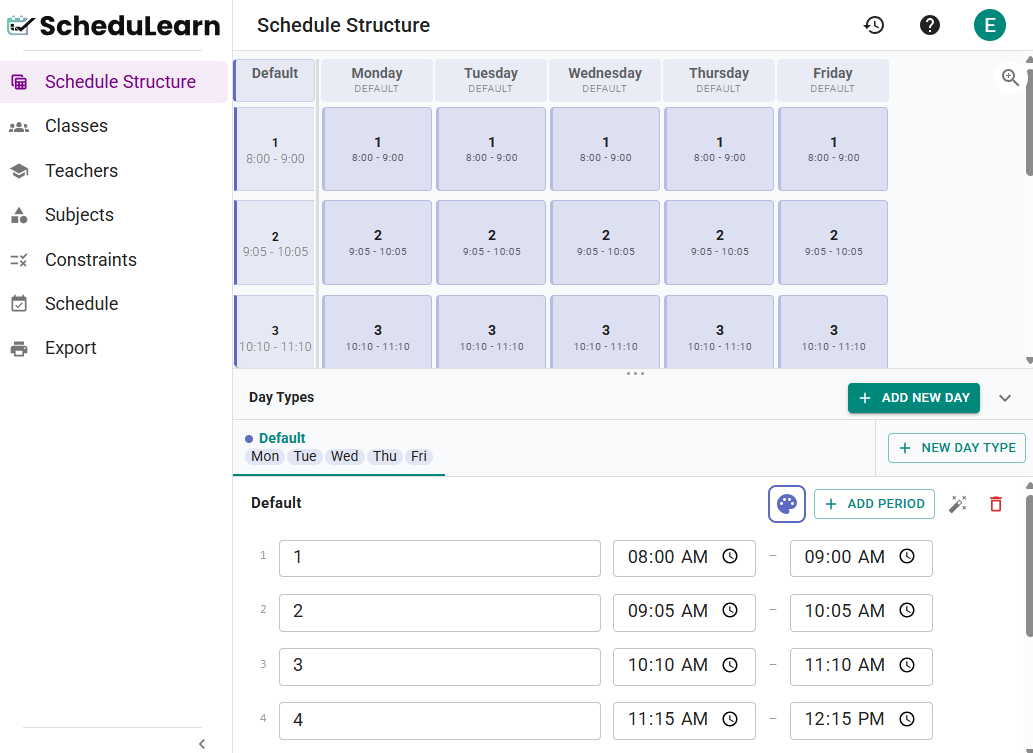
Figure 3: The schedule structure page and day type manager.
The bottom section of the page is the Day Type Manager. Here you can fine-tune each layout by:
- renaming periods,
- adjusting start and end times,
- adding or removing periods.
Tip
The Day Type Manager can be resized by dragging the intersection point, or collapsed using the arrow on the right side.
Shifting Periods Automatically
When you modify a period’s start or end time, ScheduLearn can automatically shift the surrounding periods to maintain consistent spacing.
After changing a time, you will see:
- a ✔ button to save the change without shifting other periods,
- an ✖ button to cancel the change,
- and a clipboard icon to open the shift dialog.

Figure 4: Modifying a period's start or end.
For example changing a period from 8:00–9:00 to 8:00–8:45 allows ScheduLearn to automatically shift all following periods back by 15 minutes.
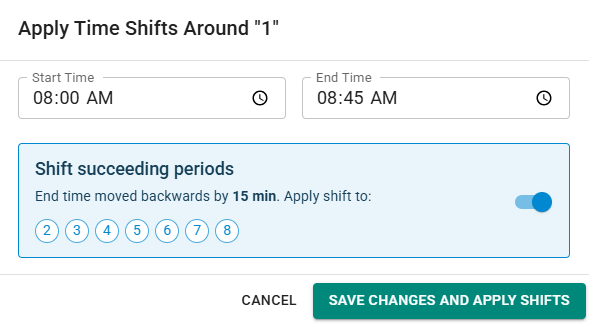
Figure 5: Automatically shifting periods after modifying a time.
Similarly, moving a period earlier can shift preceding periods forward.
Non-Academic Periods
By default, all cells are enabled, meaning lessons may be scheduled during those times.
To make a period non-academic (such as lunch, recess, or dismissal):
- click an individual cell to disable scheduling at that day and period,
- or click the period label to disable the entire period across all days.
Disabled cells indicate that no lessons should be scheduled during that time.
Tip
If lunch can occur during multiple periods, you may prefer to leave those periods enabled and schedule lunch as a subject instead. Disabled cells can always be re-enabled later by clicking them again.
Creating Additional Day Layouts
If a day only ends earlier than normal, you may not need a new layout. In many cases, you can simply disable the unused periods for that day.
However, if a day has genuinely different period times or structure, you should create a separate day layout.
To create a new layout:
- click the New Day Layout button,
- or click a day header and choose Make this day different to start from the existing day layout and then make your changes.
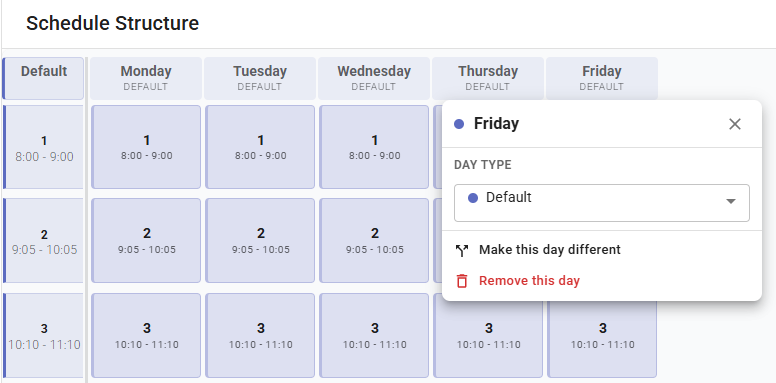
Figure 6: Creating a separate layout for a specific day.
After creating the new layout:
- Navigate to it in the Day Layout Manager.
- Give it a clear, descriptive name.
- Add periods manually using Add Period, or launch the setup wizard using the wand icon.
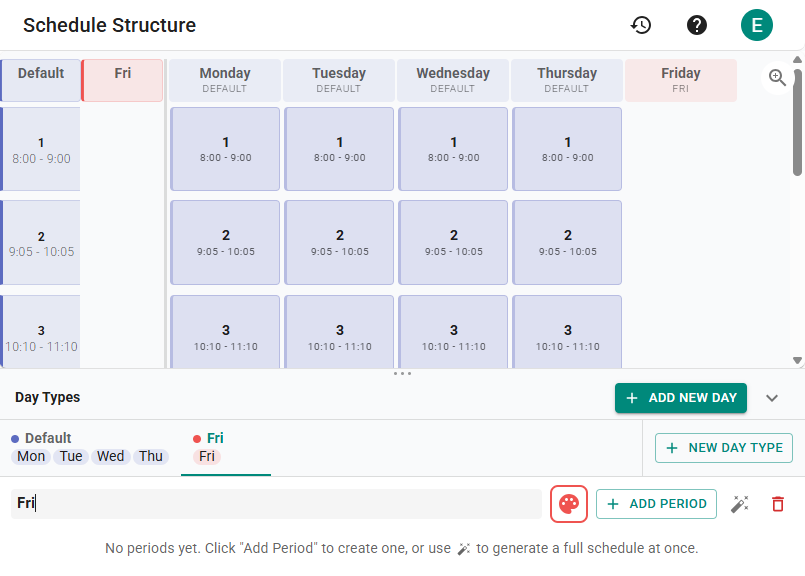
Figure 7: Creating and configuring a new day layout.
To assign a layout to a specific day:
- Click the day header.
- Select the desired layout.
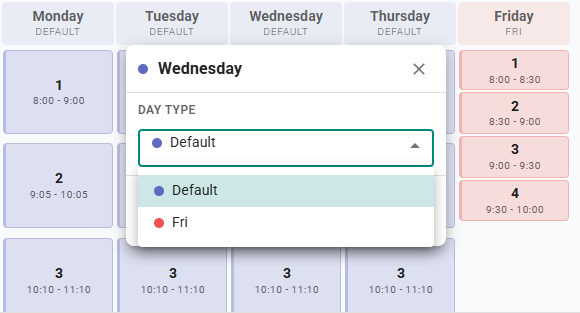
Figure 8: Assigning a day layout to a specific day.
You can rename any day, period, day type, or schedule structure by clicking on the text, turning it into a text box editor.
Migrating Data to a New Day Type
If you have already scheduled lessons or created constraints, changing a day's layout requires careful handling to prevent data loss. Because lessons and constraints are tied to specific periods, changing the day type changes those underlying periods.
When you assign a different layout to a day that already contains data, ScheduLearn will prompt you with a Data Migration window.

Figure 9: Mapping existing data to a new day layout.
In this window, you can:
- Map Old Periods to New Periods: Use the dropdowns to match periods from the old layout to the corresponding periods in the new layout. By default, ScheduLearn will automatically attempt to match them.
- Drop / Unschedule: If the new layout has fewer periods, or if you no longer want to keep certain periods, you can select Drop / Unschedule.
- Review the Impact Summary: As you adjust the mapping dropdowns, the panel on the right will update in real-time. It displays exactly how many lessons will be safely transferred, how many will be unscheduled, and whether any constraints will be deleted as a result of the change.
Silent Data Migration
If you use the Make this day different option, ScheduLearn creates an exact duplicate of the current layout. Because the new periods perfectly match the old ones, your data is migrated silently in the background. No manual mapping is required, and all your lessons and constraints will remain exactly where they were.
Multiple Schedule Structures
You may need multiple schedule structures if different divisions operate on different schedules.
Example: A Middle School may use 45-minute periods while the High School uses 40-minute periods.
You likely do not need multiple schedule structures if grades simply have lunch during different periods, but the overall schedule remains aligned.
To add another schedule structure:
- Click the New Schedule Structure button near the top of the page.
- Repeat the setup process.
You can:
- create entirely new day layouts,
- or reuse layouts from another structure.
Keep in mind that changes made to a shared layout will affect every schedule structure using that layout.
If you do not see the option to create another schedule structure, the feature may not be enabled on your account. Contact support to activate it.
You can rename each schedule structure to something more descriptive, such as:
- Middle School
- High School
- Boys Division
- K–5
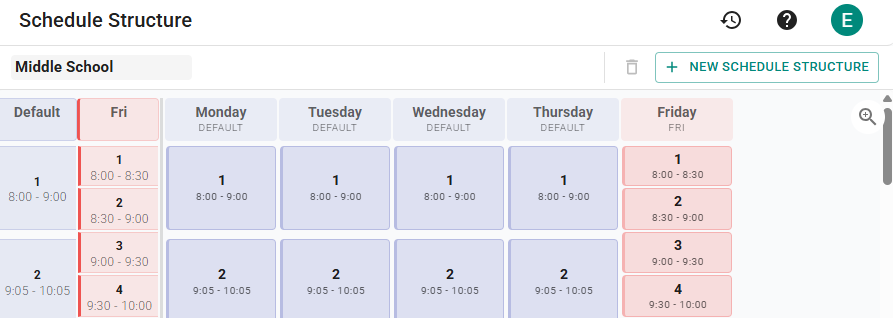
Figure 9: Creating an additional schedule structure.